So anyway, basically what happened was a few years ago I once randomly just ‘cause tried buying VPS service from DigitalOcean1. The reason was… none. It was just for fun, why would there need to be a reason hehe~
Short story, that VPS from DO or DigitalOcean didn’t even last a month and I already ended it. After several full moons and getting lost here and there2, finally my choice fell to Hetzner1. A cloud server provider that people said was quite difficult to register for. Turns out, yeah it really was! Hahaha.
Short story, at that time I didn’t know anything but was curious following this tutorial. It started with the term Jamstack that I just learned about very prematurely which brought me to the question,
What if static sites could be engineered to still consume dynamic data? a writer learning web stuff in a haphazard way3
Without any fa-fi-fu was-wes-wos, I immediately registered an account and bought rented a VPS from Hetzner (the cheapest one of course). I diligently followed that tutorial. One by one all obstacles stretched out, not a problem and won’t be a burden on my mind—I googled for the solutions as much as possible.
My days were divided between work matters, heart matters—ehem stomach and the Hetzner server matters. Until one time I followed the whisper in my ear. Yes, I sulked/got mad/was sulky/was resentful and didn’t continue that curiosity hahaha.
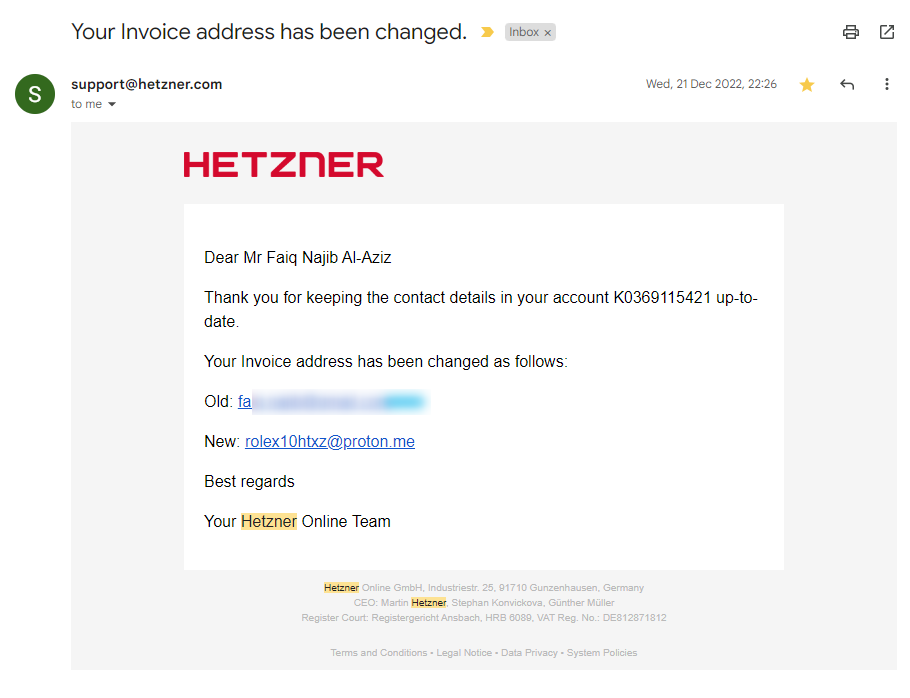
That Hetzner VPS was finally neglected. Until a strange email came in. The content informed that my billing (invoices) address had changed. Ja*cok. I just found out what it feels like to get hacked.
online debit card threat hahaha
Luckily the support team was very responsive when I sent an email to report that incident. They finally replied: “As your account got hacked and you had no products (except the ones ordered by the hacker) we have cancelled your account.”
Alhamdulillah my online debit was still safe. Turns out various warnings about hard-to-guess password combinations4 are indeed true, and very useful.
OK! So basically, my earlier writing had no point and wasn’t directly connected to this post hehe.
Choose and set up VPS #
This year, I got back together with Hetzner hehe. Previously, I had already repeated 3 times registering for a Hetzner account whether with the same email or a different email but all were rejected. Well, but everything was resolved after complaining about my old account being suspended due to being hacked. And, voila my account was active again~~
As a result, a CAX11 type VPS powered by Ampere® Altra® processors was successfully rented by me. The price, well it’s cheap compared to monthly wifi costs.
The VPS was active and I immediately set its configuration and then did login.
If on Windows devices, VPS access can be through the PuTTY application. Download and do as usual, next, next, and next until the installation is complete.
Login to the VPS #
After being installed correctly, do the following steps:
- Open the PuTTY application.
- Copy the IP Address from Cloud Console, adjust whether to use
IPv45 orIPv65. Then leave port at22. - Paste the IP Address into the column in PuTTY and click the
Openbutton. Then a terminal/CMD window will appear. - Enter the username and password from the VPS’s
rootaccount. Note that the password typed doesn’t appear in the PuTTY terminal.
Besides that, you can also login through terminal/CMD window with the following steps:
- Open terminal and type
ssh username@ip_address. - Wait a moment and the terminal display will ask to enter the password from the username that will access that VPS.
If using Ubuntu, then do update and upgrade on the VPS’s package with the command:
sudo apt update
sudo apt upgrade
If the VPS asks for confirmation, then type -y then wait until it’s done. Follow if the VPS asks to do a reboot.
Set up VPS firewall #
On Ubuntu, do the following steps:
-
Allow UFW to be active on the VPS,
sudo ufw enable -
If the VPS returns a response that the command is not recognized, then install first,
sudo apt-get install ufw -
If already installed, then do the first step again.
-
Check firewall status,
sudo ufw status -
Add rules according to what is needed.
Set up applications according to what is needed #
Because basically this VPS will be used as a hosting place for projects so they can be demo-ed for personal portfolio purposes, then several applications or packages will be installed.
Because there was no sure guide and just in case, I installed lots of packages and applications hahaha.
LEMP stack #
The stack used in the coding world, mainly websites, as far as I know (without data okay!) is LAMP and LEMP.
LAMP stands for Linux, Apache, MySQL, PHP. While LEMP stands for Linux, Nginx, MySQL, PHP.
Coincidentally, I `randomly again chose this LEMP stack. Oh forgot, there was a reason ding. This VPS I had already planned as a subdomain of this website, which is portfolio.najib.id hehehe. Anyway, here are the steps.
Install NGINX web server #
Update the VPS first and can add -y to directly confirm packages that will be updated.
sudo apt update -y
Then, continue installing NGINX.
sudo apt install nginx -y
After NGINX installation is complete and ufw is already allowed from the previous step, next check which applications can be entered into the ufw rule.
sudo ufw app list
The output displayed by the VPS, more or less like the following,
Output
Available applications:
  Nginx Full
  Nginx HTTP
  Nginx HTTPS
  OpenSSH
Allow port 80 which by default is the port that accepts HTTP access.
sudo ufw allow 'Nginx HTTP'
Check again the status on ufw.
sudo ufw status
The output will more or less be like the following
Output
Status: active

To                         Action      From
--                         ------      ----
OpenSSH                    ALLOW       Anywhere
Nginx HTTP                 ALLOW       Anywhere
OpenSSH (v6)               ALLOW       Anywhere (v6)
Nginx HTTP (v6)            ALLOW       Anywhere (v6)
Check the NGINX configuration results in the browser by entering http://ip_address or domain_qoeh.com. The result is the writing Welcome to nginx!.
Install MariaDB RDBMS #
Because it was still in close time, could directly install package MariaDB without having to do update package first.
sudo apt install mariadb-server
Make sure MariaDB is already running.
sudo systemctl start mariadb.service
Then, do configuration on MariaDB.
sudo mysql_secure_installation
Adjust the prompt with what is needed.
Next, I chose the option to add a user other than root.
sudo mariadb
After entering the MariaDB [(none)]> prompt, create that new user and set its privilege.
GRANT ALL ON *.* TO 'budi'@'localhost' IDENTIFIED BY 'BudiTanpoHutang619' WITH GRANT OPTION;
Do flush privileges to ensure the new user configuration.
FLUSH PRIVILEGES;
OK! Exit from MariaDB prompt
exit
Install PHP #
Do PHP installation with the version according to what is needed.
sudo apt install php8.1-fpm php-mysql
Configure NGINX to use PHP #
First, create a web root directory with the desired domain, for example is portfolio.najib.id as the folder name.
sudo mkdir /var/www/portfolio.najib.id
Set directory ownership with $USER.
sudo chown -R $USER:$USER /var/www/portfolio.najib.id
Then, create NGINX configuration in the sites_available directory through nano.
sudo nano /etc/nginx/sites-available/portfolio.najib.id
In the newly created domain configuration file, fill with content like the following.
# located at /etc/nginx/sites-available/portfolio.najib.id

server {
    listen 80;
    server_name portfolio.najib.id www.portfolio.najib.id;
    root /var/www/portfolio.najib.id;

    index index.html index.htm index.php;

    location / {
        try_files $uri $uri/ =404;
    }

    location ~ \.php$ {
        include snippets/fastcgi-php.conf;
        fastcgi_pass unix:/var/run/php/php8.1-fpm.sock;
     }

    location ~ /\.ht {
        deny all;
    }

}
Done changing, exit from nano editor with CTRL + X then Y to confirm saving the changed file, and press ENTER.
Create a symbolic link from that directory.
sudo ln -s /etc/nginx/sites-available/portfolio.najib.id /etc/nginx/sites-enabled/
Disconnect the symbolic link of the default configuration.
sudo unlink /etc/nginx/sites-enabled/default
Then check the configuration by testing it.
sudo nginx -t
If successful, will appear results like the following. If not successful, means there is port 80 from other configuration that is also ‘pulled’ by NGINX.
nginx: the configuration file /etc/nginx/nginx.conf syntax is ok
nginx: configuration file /etc/nginx/nginx.conf test is successful
Restart NGINX to apply configuration changes.
sudo systemctl reload nginx
Create the initial page of the website when IP Address or domain is accessed.
nano /var/www/portfolio.najib.id/index.html
Fill the index.html file example like this
<html>
<!-- /var/www/portfolio.najib.id/index.html -->

  <head>
    <title>portfolio.najib.id website</title>
  </head>

  <body>
    <h1>Hello World!</h1>

    <p>This is the landing page of <strong>portfolio.najib.id</strong>.</p>
  </body>

</html>
Check the results in the browser by entering http://ip_address or domain_qoeh.com.
PostgreSQL Database #
Install package PostgreSQL with the following command.
sudo apt install postgresql postgresql-contrib
That installation will create a user with the name postgres with root role on PostgreSQL.
When wanting to create a new user or role, then can use the following command.
sudo -u postgres createuser --interactive
And will appear prompt on the terminal that can be filled according to needs.
Output
Enter name of role to add: sammy
Shall the new role be a superuser? (y/n) y
MongoDB Database #
First, enter the GPG public key through the curl command.
curl -fsSL https://www.mongodb.org/static/pgp/server-4.4.asc | sudo apt-key add -
Continue by registering the MongoDB package to apt. Here I only use the arm64 option which adjusts to the type of processor which is ARM64.
echo "deb [ arch=arm64 ] https://repo.mongodb.org/apt/ubuntu focal/mongodb-org/4.4 multiverse" | sudo tee /etc/apt/sources.list.d/mongodb-org-4.4.list
Update the package on apt.
sudo apt update
Only then install MongoDB.
sudo apt install mongodb-org
Run the MongoDB service.
sudo systemctl start mongod.service
And, check the status of MongoDB.
sudo systemctl status mongod
Give permission to MongoDB to run when the VPS is on.
sudo systemctl enable mongod
Test MongoDB connection.
mongosh --eval 'db.runCommand({ connectionStatus: 1 })'
The output obtained is like the following. Here I use mongosh because the mongo command is not detected by the VPS.
Current Mongosh Log ID: 64c94ce4a0986579ea215006
Connecting to:          mongodb://127.0.0.1:27017/?directConnection=true&serverSelectionTimeoutMS=2000&appName=mongosh+1.10.2
Using MongoDB:          6.0.8
Using Mongosh:          1.10.2

For mongosh info see: https://docs.mongodb.com/mongodb-shell/

------
   The server generated these startup warnings when booting
   2023-07-31T08:50:33.805+00:00: Using the XFS filesystem is strongly recommended with the WiredTiger storage engine. See http://dochub.mongodb.org/core/prodnotes-filesystem
   2023-07-31T08:50:34.751+00:00: Access control is not enabled for the database. Read and write access to data and configuration is unrestricted
   2023-07-31T08:50:34.751+00:00: vm.max_map_count is too low
------

{
  authInfo: { authenticatedUsers: [], authenticatedUserRoles: [] },
  ok: 1
}
Troubleshooting #
For database connection needs remotely from personal devices, can do connection settings through bind_address=0.0.0.0 and set the firewall. There are lots of tutorials on Google hehehe.
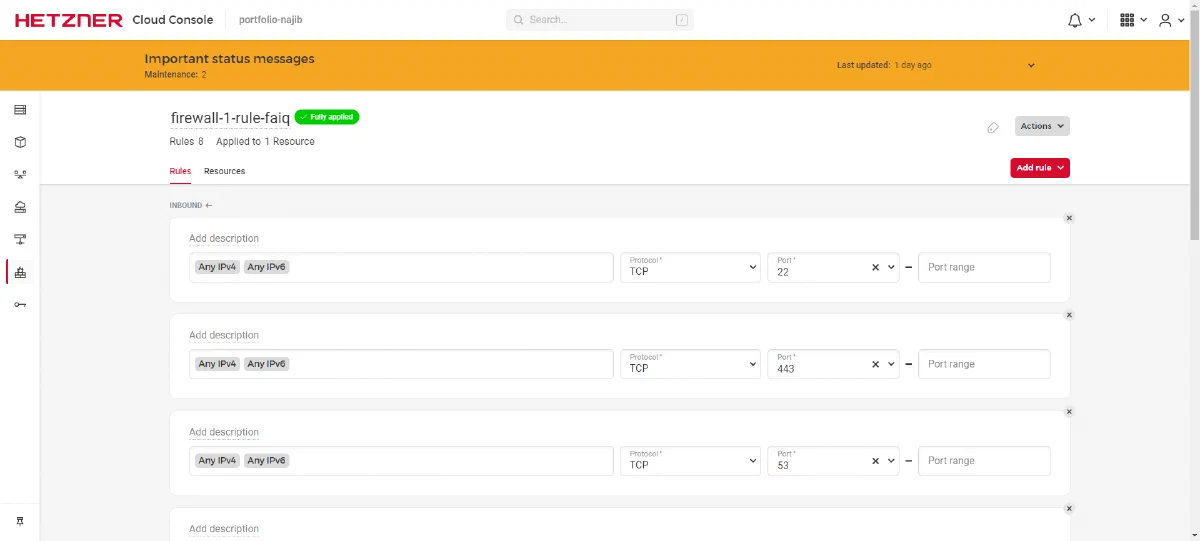
In this condition, I got an error that remote database connection couldn’t be done even though the configuration was already according to what exists on the internet. Turns out the solution that must be done is to set the firewall on the Hetzner console dashboard also. That’s for Hetzner, I don’t know how other cloud providers are.
For example on the link https://console.hetzner.cloud/projects/9922305/firewalls/199524/rules, this is just an example link.
Lessons That Can Be Taken #
OK! Purchasing or renting VPS/cloud service is quite tricky because it could be the provider only gives gimmick and not the real results promised. That is according to accounts from several threads from the LowEndTalk forum. Friends can search for themselves from that forum.
Installing packages on VPS has different commands. Because it depends on the flavors of the Linux OS itself. If Ubuntu distro uses apt, then maybe it will be different with other distros.
The VPS root password can be reset from the VPS provider account’s console dashboard.
And, Hetzner seems to have a layered firewall, starting from its console dashboard and the firewall on the VPS itself. Whether I lack knowledge or lack of tinkering with VPS myself, but that was my impression hehe.
My reason for using NGINX is at the same time as a reverse proxy because my main domain is already through Netlify which serves the static website. While NGINX will act to route when the subdomain portfolio.najib.id is accessed by internet users. That was my plan, at least according to information and knowledge I got from Google hehe.
Thank you to those who wandered into this notes section and read it. Hopefully these notes are useful for you.
That’s all. Greetings.
-
Unique website forum that I just found, until VPS comparison site. ↩︎
-
Haphazard learning is… hmm… seems when googling, there’s no clear explanation. But, I once found a post on LinkedIn (sorry again, I forgot to save that post) that discussed that haphazard learning is knowledge learned not in order and taken from various sources without definite teacher guidance. More or less like that as I remember hehe. ↩︎
-
Password combinations considered Good according to article from Harvard University are combinations of uppercase letters, lowercase letters, numbers and symbols. For example,
budi@TanpoHutang619. ↩︎ -
The difference is, IPv4 is the old version IP Address which is usually used until now even when this post was written. While IPv6 is a newer type of IP Address. It needs to be noted that not all internet/wifi providers in Indonesia provide IPv6, so choose VPS wisely :) ↩︎ ↩︎